
AI Headshot Lighting Mistakes to Avoid: 7 Errors Ruining Your Professional Image
Your AI headshot looks plastic, washed out, or weirdly shadowed, and you can't figure out why. The culprit is almost always lighting. According to research on commercial AI imaging systems, lighting quality accounts for over 60% of perceived image professionalism (Arnò et al., 2021). Poor lighting doesn't just make you look bad; it signals to recruiters, clients, and connections that you haven't invested in your professional presence.
Here's the reality: AI headshot generators are only as good as the input they receive. Feed them poorly lit source photos, and even the most advanced algorithms will produce results that scream "fake." The good news? These lighting mistakes are predictable and fixable. Whether you're using The Looktara Lens or another AI photography tool, understanding these errors will transform your results from awkward to polished.
Why Lighting Makes or Breaks AI Headshots
Traditional photographers spend years mastering light because it shapes how we perceive faces. AI systems attempt to replicate this expertise, but they need proper raw material to work with.
Key insight: AI headshot tools don't create good lighting; they enhance or struggle with whatever lighting exists in your source photos.
When you upload a selfie taken under harsh overhead fluorescents, the AI must decide how to handle unflattering shadows, color casts, and uneven exposure. Most systems default to over-smoothing, creating that telltale "AI plastic" look. Others attempt to correct lighting digitally, introducing artifacts and unnatural skin tones.
The Source Photo Problem
Most people grab whatever photo is handy: a quick selfie, a cropped group shot, or that conference badge photo from 2019. These images share common lighting problems:
- Mixed light sources creating competing color temperatures
- Overhead lighting casting dark eye sockets and nose shadows
- Backlit situations leaving faces underexposed
- Flash photography flattening facial features
The AI then amplifies these issues while trying to create a professional result. Understanding this relationship between input and output is the first step toward better headshots.
Mistake 1: Using Harsh Overhead Lighting
Walk into any office building, and you'll find rows of fluorescent ceiling lights. They're efficient and terrible for portraits. When light comes directly from above, it creates what photographers call "raccoon eyes," deep shadows in the eye sockets that make you look tired or sinister.
AI systems struggle with overhead lighting because the shadow patterns conflict with the "professional headshot" aesthetic they're trained to produce. The algorithm tries to fill in shadows digitally, often resulting in flat, lifeless eyes or unnaturally bright under-eye areas.
The Fix for Overhead Light
Position yourself facing a window during daylight hours. Natural light from the side or front eliminates harsh overhead shadows. If you must shoot under ceiling lights:
- Find a white wall and face it; the reflected light will fill shadows
- Add a desk lamp at eye level to counteract overhead sources
- Use a piece of white paper or foam board as a reflector below your chin
Platforms like The Looktara Lens can correct minor lighting issues, but starting with better source lighting produces dramatically superior results.
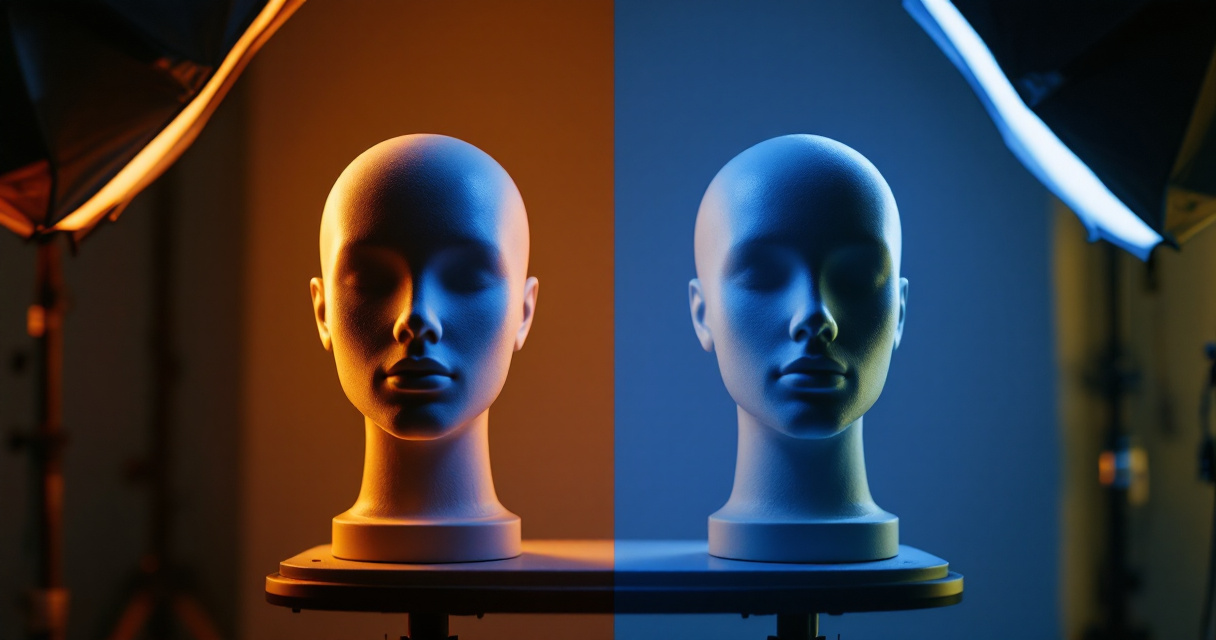
Mistake 2: Ignoring Color Temperature Mismatches
Your brain automatically adjusts for different light colors, but cameras and AI don't. Mixing warm tungsten bulbs with cool daylight creates competing color casts that confuse AI processing.
Common Color Temperature Issues
| Light Source | Color Temperature | Effect on Skin |
|---|---|---|
| Daylight (noon) | 5500K | Neutral, natural |
| Overcast sky | 6500K | Slightly cool, pale |
| Tungsten bulbs | 2700K | Orange, warm |
| Fluorescent | 4000K | Green cast |
| LED (variable) | 2700-6500K | Depends on setting |
When you photograph yourself near a window while a desk lamp is on, you'll have warm shadows and cool highlights. AI systems interpret this as unhealthy skin tones and may overcorrect in unpredictable ways.
Achieving Consistent Color
The solution is simple: use one light source. Turn off competing lights when shooting near windows. If using artificial light, match all bulbs to the same color temperature.
For professionals creating content beyond headshots, consistent lighting matters across all visual assets. Whether you're generating professional resume headshots or LinkedIn post graphics, maintaining color consistency builds brand recognition.
Mistake 3: Flat Front Lighting That Erases Dimension
The opposite extreme from harsh shadows is no shadows at all. Ring lights became popular for video calls because they eliminate shadows, but they also eliminate the depth and dimension that make faces interesting.
Reality check: Professional portrait photographers almost never use flat front lighting. It makes faces look two-dimensional and removes the subtle shadows that define bone structure.
AI headshot generators trained on professional photography expect some natural shadowing. When fed flat-lit source images, they may add artificial shadows that don't match actual facial geometry, creating an uncanny valley effect.
Creating Natural Dimension
Move your primary light source 30 to 45 degrees to one side of your face. This creates subtle shadows on the opposite cheek that define your features without being harsh. The technique is called Rembrandt lighting, named after the painter who mastered it centuries ago.
You don't need professional equipment. A window with sheer curtains provides perfect diffused side lighting for free.
Mistake 4: Backlit Silhouettes and Blown Highlights
Standing with a window behind you seems logical; you want that nice bright background. Unfortunately, this creates a silhouette effect where your face is underexposed and the background is overexposed.
AI systems handle this poorly for two reasons:
- Lost detail in underexposed faces can't be recovered, only invented
- Blown highlights in backgrounds create distracting halos around hair
The algorithm must guess what your facial features look like in shadow, leading to generic or distorted results.
Repositioning for Better Exposure
Face the window instead of turning your back to it. If you need the specific background, use exposure compensation or HDR mode on your phone to balance the exposure. Better yet, shoot when the outdoor light isn't as intense, such as during overcast conditions or golden hour.
This principle applies whether you're creating headshots or website hero images. Balanced exposure makes AI processing significantly more effective.
Mistake 5: Colored Light Reflections
Wearing a bright red shirt? Your face now has a red tint from light bouncing off the fabric. Standing near a green wall? Same problem. These color contaminations are subtle in person but glaring in photos.
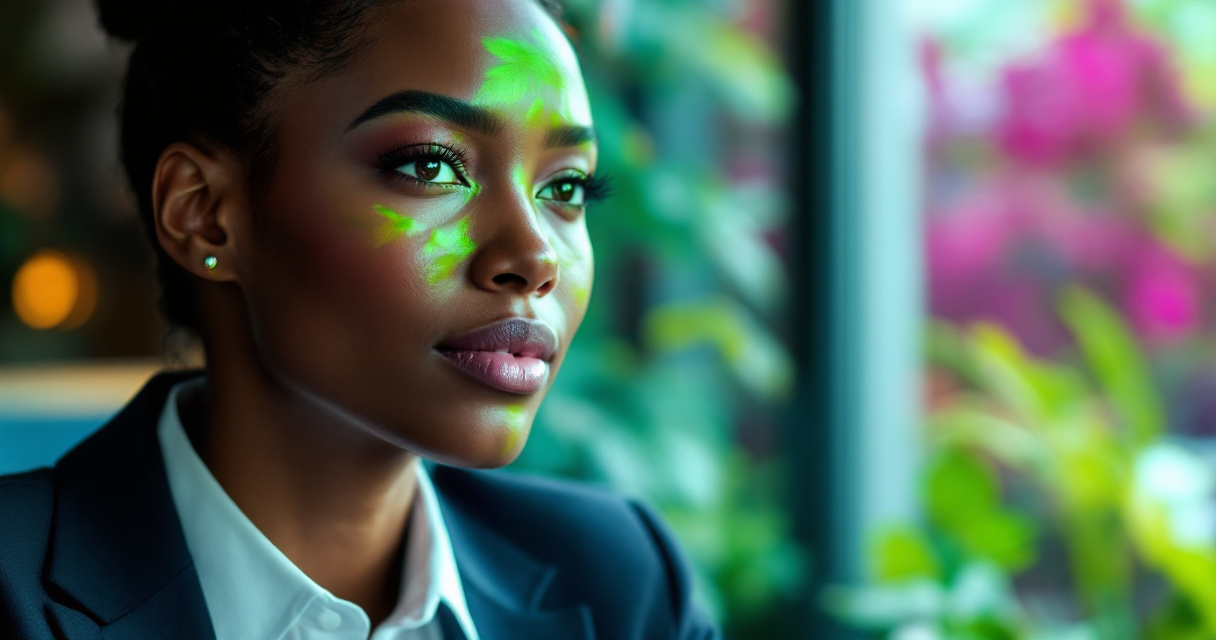
AI headshot tools don't distinguish between intentional and accidental color casts. They may interpret that green reflection as your actual skin tone and "correct" the rest of your face to match, creating sickly results.
Controlling Environmental Color
Wear neutral colors; white, gray, or black; when taking source photos. Choose a background that's neutral or matches your intended aesthetic. If shooting near colorful objects, increase the distance between yourself and anything that might reflect onto your skin.
- Avoid shooting near brightly painted walls
- Watch for colored furniture or artwork in your reflection zone
- Check for tinted windows that shift overall color balance
Mistake 6: Uneven Lighting Across the Face
Half your face lit by a window, half in shadow from a wall, creates dramatic contrast that works for moody portraits but fails for professional headshots. AI systems trained on evenly lit corporate photography don't know how to handle extreme contrast ratios.
Lighting Ratio Guidelines
Professional headshot photographers typically aim for a 2:1 or 3:1 lighting ratio, meaning the bright side of the face is two to three times brighter than the shadow side. More extreme ratios create artistic effects that AI struggles to process.
Balance your lighting by:
- Adding a reflector or white surface on the shadow side
- Moving away from walls that block light from one direction
- Using two light sources of similar intensity from different angles
This video demonstrates how lighting corrections can eliminate the artificial look that plagues many AI-generated portraits.
Mistake 7: Ignoring Light Direction for Expression
Light from below makes everyone look like a horror movie villain. Light from directly above creates unflattering shadows. The direction of light affects emotional perception more than most people realize.
AI headshots inherit whatever emotional quality the source lighting creates. If your source photo has ominous upward lighting from a laptop screen, the AI can't transform that into warm, approachable professional lighting.
Optimal Light Positioning
Position your primary light source slightly above eye level and 30 to 45 degrees to one side. This creates the universally flattering "beauty lighting" pattern used in professional photography.
Pro tip: A simple test is to look at the catchlights, the reflections in your eyes. They should appear in the upper portion of your pupils, indicating light is coming from above but not too high.
Using The Looktara Lens platform with properly lit source photos produces results that rival traditional professional photography at a fraction of the cost and time investment.
Quick Reference: Lighting Checklist
Before uploading your next source photo for AI headshot generation, run through this checklist:
Pre-Upload Lighting Audit
| Element | Check | Fix |
|---|---|---|
| Light direction | Above eye level, not overhead | Move or add front-facing light |
| Color consistency | Single light source or matched temps | Turn off competing lights |
| Shadow depth | Visible but not harsh | Add reflector or move light |
| Background exposure | Similar to face exposure | Reposition or adjust camera |
| Color contamination | No tints from clothing/walls | Change clothes or location |
| Eye catchlights | Visible in upper pupils | Adjust light height |
Conclusion
Every AI headshot platform, no matter how sophisticated, depends on quality input to deliver quality output. The seven lighting mistakes covered here; harsh overhead light, color mismatches, flat lighting, backlit silhouettes, color reflections, uneven exposure, and poor light direction; account for the majority of failed AI headshots.
Spend ten minutes fixing your lighting setup before your next upload, and you'll see immediate improvements. Find a window with diffused daylight, turn off other light sources, face the light at a slight angle, and wear neutral clothing. These simple adjustments transform mediocre AI results into polished professional images.
Ready to create headshots that actually represent your professional brand? Try The Looktara Lens with your newly optimized source photos and experience the difference proper lighting makes. For additional visual content needs, explore tools for creating YouTube thumbnails and TikTok covers that maintain consistent professional quality across your entire online presence.